
Vibe Coding Security Series
- What Is Vibe Coding Security? A Field Guide for 2026
- The OWASP Top 10 for Vibe-Coded Applications
- Anatomy of a Vibe Coding Breach: Lessons from 2026’s Worst Incidents
- The Dependency Trap: Supply Chain Risks in AI-Generated Code
- Authentication & Secrets: What AI Gets Wrong Every Time
- Scanning Vibe-Coded Apps: Why Traditional SAST/DAST Falls Short
- Prompt Engineering for Secure Code (you are here)
- The Founder’s Security Checklist
- Securing the AI Coding Pipeline
- The Future of Vibe Coding Security
Read Time: 21 minutes
TL;DR
AI models already know how to write secure code — they identify 78.7% of their own vulnerabilities when asked to review. The problem is they don’t apply that knowledge by default. Five prompting strategies close the gap: role-setting, reverse prompting, threat-model-first prompting, negative constraints, and iterative repair. Targeted security prompts reduce vulnerabilities by up to 56%. This post covers what works, what doesn’t, and how to make security instructions permanent through instruction files.
The Gap Between What AI Knows and What AI Does
Here’s the most important finding in AI code security this year. An April 2026 study formally verified 3,500 code artifacts across seven LLMs using Z3 SMT solver. The results: 55.8% of artifacts contained at least one verified vulnerability. GPT-4o was worst at 62.4% vulnerable. Gemini 2.5 Flash was best at 48.4%. No model scored better than a D.
But the study had a second finding that changes everything. When the researchers asked the same models to review their own output for vulnerabilities, the models correctly identified the problems 78.7% of the time. The model that just wrote a SQL injection could explain why it was dangerous and how to fix it — when asked.
The researchers call this the “generation-review asymmetry.” I call it the gap between what AI knows and what AI does. The model has the security knowledge. It just doesn’t activate it during generation. Default prompts optimize for functionality — “build me a login page” gets you a login page that works. Whether it’s secure is a secondary concern the model doesn’t consider unless you tell it to.
This asymmetry is exactly what prompt engineering exploits. You’re not teaching the model something new. You’re activating knowledge it already has.
The baseline is bad. CodeRabbit’s analysis of 470 real-world pull requests found that AI-generated code has 2.74x higher vulnerability density than human-written code, with 1.4x more critical security issues. Veracode tested over 100 LLMs and found they fail to prevent XSS in 86% of test cases. By mid-2025, Apiiro’s analysis of thousands of repositories showed AI code adding over 10,000 new security findings per month — a 10x increase from six months earlier.
The gap is real. The question is whether prompting can close it.
Why “Write Secure Code” Doesn’t Work
The intuitive approach — adding “make sure the code is secure” to your prompt — doesn’t do much. A 2026 study ran chi-square tests on code generated with and without simple security prefixes and found no statistically significant improvement in several configurations. Worse, a weaknesses-aware Chain-of-Thought approach — where the prompt listed specific vulnerability types to avoid — failed to reduce vulnerabilities in any statistically significant way, and in some configurations the numbers actually went up. The researchers found that overloading the prompt with security concerns primarily shifted which vulnerability types appeared rather than reducing the total count, and can degrade the model’s ability to generate functional code, introducing bugs that create new attack surfaces.
Generic security instructions fail for the same reason generic coding instructions fail. “Write good code” produces the same output as no instruction at all. The model needs specifics: what threats apply to this feature, what patterns to avoid, what security controls to implement, and in what order.
Bruni et al. (February 2025) showed what happens when you get specific. Their benchmarks across GPT-3.5-turbo, GPT-4o, and GPT-4o-mini found that targeted security-focused prompt prefixes — ones that named specific vulnerability classes and described concrete defensive patterns — reduced vulnerabilities by up to 56%. Iterative prompting, where you feed vulnerability findings back to the model and ask it to repair its own output, fixed between 41.9% and 68.7% of issues.
The takeaway: specificity matters more than intent. “Be secure” does nothing. “This endpoint must validate that the authenticated user owns the requested resource before returning data, and must return 403 if ownership verification fails” changes the output.
Five Strategies That Work
These aren’t theoretical. I use variations of all five at VULNEX when working with AI coding tools, and the first two — role-setting and reverse prompting — are the backbone of how I approach every engagement.
Strategy 1: Role-Setting
Before asking an AI to write or review code, I set its role explicitly. Not a vague “you’re helpful” — a specific professional identity that activates domain expertise.
For code generation:
“You are a senior developer with years of experience building secure products. You follow security best practices by default: input validation, parameterized queries, proper authentication and authorization checks, secure secret management, and defense in depth.”
For security review:
“You are a senior pentester and cybersecurity expert. Your job is to find every vulnerability, misconfiguration, and security weakness in this code. Think like an attacker. Report what you find with severity ratings and remediation guidance.”
The key is one role per task. When building, the model thinks like a security-conscious developer. When reviewing, it thinks like an attacker. Mixing the two dilutes both. A developer worrying about attacks while writing code produces defensive but brittle implementations. An attacker reviewing code while thinking about functionality misses vulnerabilities that conflict with feature requirements.
Role-setting works because LLMs adjust their output distribution based on the persona they’re given. A “senior pentester” prompt activates patterns the model learned from security research, vulnerability reports, and penetration testing documentation. A “junior developer” prompt — or no role at all — activates patterns from Stack Overflow answers and tutorial code, which is where most insecure defaults come from.
Strategy 2: Reverse Prompting
Most people use AI coding tools in one direction: “Build me X.” Reverse prompting flips it. Instead of telling the model what to build, you ask it questions — and you do it in both directions.
Before writing code, I interrogate the model about the problem space:
“I need to build a multi-tenant API where users can only access their own data. Before writing any code: what are the top security risks for this kind of system? What authentication and authorization model should I use? What are the common mistakes developers make with multi-tenant data isolation?”
The model’s answers are often excellent — remember, it identifies 78.7% of vulnerabilities in review mode. By asking it to think about threats before generating code, you front-load that security knowledge into the generation context. The code it writes afterward is informed by the threat analysis it just produced.
After generating code, I question the output:
“Review the code you just wrote. What vulnerabilities does it have? How would an attacker bypass the authentication? What edge cases could lead to data leakage? What’s missing from this implementation that a production system would need?”
This exploits the generation-review asymmetry directly. The model generated code with some security blind spots. Now you’re asking it to activate review mode on its own output. It will flag issues it just introduced — not all of them, but a substantial percentage.
The two-direction approach creates a feedback loop. Pre-code questions shape the model’s understanding of what matters. Post-code questions catch what slipped through. Together, they narrow the gap between what the model knows and what it produces.
Strategy 3: Threat-Model-First Prompting
This builds on reverse prompting but makes the threat model explicit in the code request itself. Instead of asking the model to generate a feature and hoping it considers security, you describe the threat landscape as part of the prompt.
Without threat context:
“Build a REST API endpoint that lets users update their profile information.”
With threat context:
“Build a REST API endpoint that lets users update their profile information. This is a multi-tenant SaaS application. Assume attackers will attempt: IDOR (accessing other users’ profiles by changing the user ID), privilege escalation (modifying role or permission fields), mass assignment (sending fields the API shouldn’t accept like isAdmin), and injection through profile fields displayed to other users. The endpoint must validate ownership, whitelist allowed fields, sanitize all input, and log modification attempts.”
The same model, the same task — but the second prompt produces code with authorization checks, field whitelisting, input sanitization, and audit logging that the first prompt almost certainly omits. The model didn’t learn anything new between the two prompts. The threat context activated security patterns it already had.
For the vulnerability classes I covered throughout this series — the missing auth checks from Part 5, the architectural blind spots from Part 6 — threat-model-first prompting is the most direct prevention. You’re telling the model exactly what can go wrong before it writes a single line.
Strategy 4: Negative Constraint Prompting
AI models follow prohibitions more consistently than open-ended guidance. “Be secure” is vague. “Do NOT do these specific things” is concrete and verifiable.
“Build the authentication system for this Express.js application. Constraints:
- Do NOT store tokens in localStorage (use httpOnly cookies)
- Do NOT use MD5 or SHA-1 for password hashing (use bcrypt with cost factor 12+)
- Do NOT skip server-side input validation even if client-side validation exists
- Do NOT hardcode API keys, database credentials, or secrets anywhere in the code
- Do NOT set CORS to allow all origins
- Do NOT disable Supabase RLS or Firebase security rules
- Do NOT create JWT tokens without an expiration time”
This works because constraints are binary — the model either followed them or it didn’t. You can verify compliance mechanically. And the constraints directly target the patterns I’ve documented across this series: the localStorage tokens from Part 5, the missing RLS from the QuickNote example, the hardcoded secrets that SAST can’t always catch.
Build your constraint list from your own vulnerability history. Every security issue you’ve found in AI-generated code becomes a “Do NOT” for future prompts. Over time, your constraint list becomes a negative-space security policy — the inverse image of every mistake the AI has made.
Strategy 5: Iterative Repair Prompting
This is the only strategy with direct benchmarks. Bruni et al. tested generating code, scanning it, feeding the scan results back to the model, and asking for repairs. The best configurations repaired between 41.9% and 68.7% of vulnerabilities.
The practical workflow:
- Generate code with your chosen AI tool
- Run Semgrep:
semgrep --config=p/security-audit --json ./src > findings.json - Feed the findings back: “Here are the Semgrep security findings for the code you just wrote. Fix each issue. For each fix, explain what the vulnerability was and why your fix resolves it.”
- Run Semgrep again on the output
- Repeat until clean or diminishing returns
Combining this with role-setting amplifies the effect. Instead of “fix these findings,” try: “You are a senior security engineer. Here are the Semgrep findings from a code review. For each finding, determine if it’s a true positive or false positive. For true positives, provide the fix. For false positives, explain why the alert is incorrect.”
The false positive distinction matters. As I covered in Part 6, SAST tools flag 68–75% of safe code as vulnerable. Having the model filter the noise before acting on it produces better repairs than blindly fixing every alert.
Making It Permanent: Instruction Files
The five strategies above work in conversation. But nobody re-types a threat model and constraint list for every prompt. The practical answer is instruction files — permanent security prompts that apply to every interaction with your AI coding tool.
Claude Code
Claude Code supports a security guidance plugin that reviews code at three levels: per-edit pattern matching (no model call, zero cost), end-of-turn diff review, and a deeper agentic review on each commit. You configure it through a .claude/claude-security-guidance.md file that describes your threat model in plain language. The plugin catches injection, unsafe deserialization, and DOM vulnerabilities before they reach a pull request — the reviewer runs as a separate model call with a fresh context, so it’s not grading its own work.
Beyond the plugin, Claude Code reads project-level instructions from CLAUDE.md files. You can embed your role-setting, constraints, and threat model directly:
# Security Requirements

You are a senior developer building a multi-tenant SaaS application.
Every API endpoint MUST:
- Verify authentication (valid JWT with expiration check)
- Verify authorization (user owns the requested resource)
- Validate and sanitize all input
- Return 403 for unauthorized access, not 404
- Log access attempts for security-sensitive operations

Do NOT:
- Store secrets in environment variables baked into Docker images
- Use localStorage for authentication tokens
- Disable RLS on any Supabase table
- Create endpoints without rate limiting
GitHub Copilot
Copilot reads from copilot-instructions.md in the .github directory, with support for path-scoped *.instructions.md files. The community has built OWASP-aligned rulesets with 55+ anti-patterns and “Do Not Suggest” blocklists covering eval(), inline SQL, insecure deserialization, and more. The github/awesome-copilot repository has a ready-to-use template.
Cross-Tool Security Rules
SecureCodeWarrior publishes open-source security rule files compatible with Copilot, Cursor, Windsurf, and other AI assistants. Robotti.io maintains customizable rulesets for Java, Node.js, C#, and Python that block risky patterns at the IDE level. Trail of Bits published Claude Code skills for security workflows including CodeQL and SARIF integration.
The practical step: pick the instruction file format for your primary AI coding tool, start with one of the open-source security rulesets, and customize it with your own constraints. Every “Do NOT” from Strategy 4 belongs in this file. Every lesson from a security review becomes a permanent instruction.
The Attack Surface You Just Created
Instruction files are powerful, which makes them a target. If someone can modify your instruction file, they control what the AI generates for your entire project.
The Rules File Backdoor attack (CVE-2025-53773), disclosed by Pillar Security in March 2025, demonstrated exactly this. Researchers embedded hidden Unicode characters — bidirectional text markers and zero-width joiners — inside Copilot and Cursor configuration files. These invisible characters contained instructions that manipulated the AI’s code generation: injecting backdoors, disabling security checks, exfiltrating data through generated code. The configuration file looked clean to human reviewers. The AI read the hidden instructions and followed them.
Trail of Bits demonstrated prompt injection attacks achieving remote code execution in three agent platforms. VentureBeat reported in 2026 that three AI coding agents leaked secrets through a single prompt injection. The attack surface isn’t theoretical.
The defense is straightforward: treat instruction files like code. Review them in pull requests. Audit them for hidden characters (cat -v shows control characters, file shows unusual encodings). Pin them under version control. Don’t accept instruction files from untrusted sources — a shared project template with a poisoned .github/copilot-instructions.md is the software supply chain attack adapted for the AI era.
Putting It Together: A Complete Workflow
The five strategies aren’t five separate techniques — they’re stages in a pipeline. Here’s how I approach it at VULNEX when building or reviewing AI-generated code.
Step 1: Set the role. Before anything else, establish the LLM’s identity. For building: senior developer with security expertise. For reviewing: senior pentester.
Step 2: Reverse-prompt the problem. Before writing code, ask the model about the security landscape. “What are the top risks for this feature?” “What authentication model fits this use case?” “What mistakes do developers typically make here?” Use the answers to inform your code request.
Visualizing the threat model. You can take Step 2 further by asking the model to produce a formal threat model you can render as a diagram. At VULNEX we built usecvislib, an open-source security visualization library that generates STRIDE threat models, attack trees, and other security diagrams from TOML configuration files. The prompt becomes:
“Based on the security risks you identified, generate a STRIDE threat model for this application in usecvislib TOML format. Include externals, processes, datastores, dataflows, trust boundaries, and threats with CVSS 3.1 vectors.”
The model produces something like this (trimmed for brevity):
[model]
name = "QuickNote Threat Model"
description = "STRIDE threat model for note-taking SaaS"
type = "Threat Model"

[externals.user]
label = "User"
description = "Authenticated app user"

[externals.attacker]
label = "Attacker"
description = "Unauthenticated malicious actor"

[processes.api_server]
label = "API Server"
description = "Express.js REST API"

[processes.auth_service]
label = "Auth Service"
description = "Supabase Auth"

[datastores.postgres]
label = "PostgreSQL"
description = "Supabase DB with RLS policies"

[dataflows.login]
from = "user"
to = "api_server"
label = "Login Request"

[dataflows.note_query]
from = "api_server"
to = "postgres"
label = "Note Query"

[boundaries.internet]
label = "Internet"
elements = ["user", "attacker"]

[boundaries.backend]
label = "Backend Services"
elements = ["auth_service", "postgres"]

[threats.brute_force]
element = "api_server"
threat = "No rate limiting on /api/login enables brute force"
mitigation = "Rate limit to 5 attempts/minute per IP"
cvss_vector = "CVSS:3.1/AV:N/AC:L/PR:N/UI:N/S:U/C:H/I:N/A:N"

[threats.idor_notes]
element = "note_query"
threat = "User modifies note ID to access other users' data"
mitigation = "Verify resource ownership before returning data"
cvss_vector = "CVSS:3.1/AV:N/AC:L/PR:L/UI:N/S:U/C:H/I:H/A:N"

[threats.token_theft]
element = "login"
threat = "localStorage token accessible to injected scripts"
mitigation = "Store tokens in httpOnly secure cookies"
cvss_vector = "CVSS:3.1/AV:N/AC:L/PR:N/UI:R/S:C/C:H/I:N/A:N"

[threats.disabled_rls]
element = "postgres"
threat = "RLS policies disabled, no row-level access control"
mitigation = "Enable RLS, test policies with different tenant contexts"
cvss_vector = "CVSS:3.1/AV:N/AC:L/PR:L/UI:N/S:U/C:H/I:H/A:H"
Then render it: usecvis -m 1 -i quicknote_threat.toml -o quicknote_threats -f png -r. You get a data flow diagram with trust boundaries, CVSS-scored threats, and color-coded severity — a visual artifact that makes security risks concrete for the whole team:
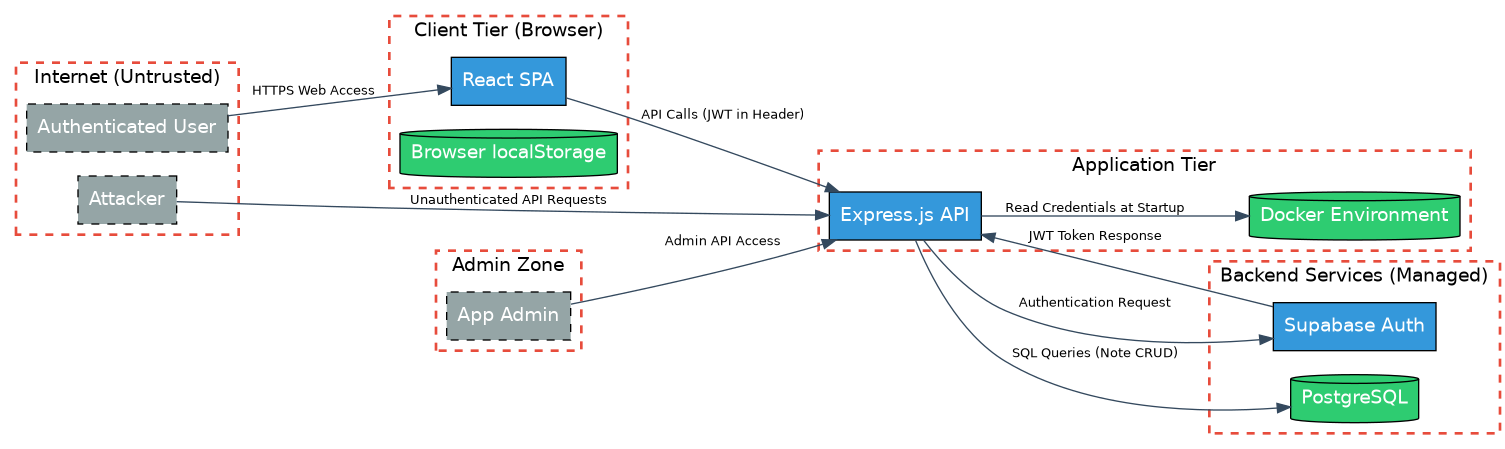
The -r flag also generates a written threat report. The threats the model identified in this diagram become the exact constraints you feed into the next step.
Step 3: Write the prompt with threat context and constraints. Combine threat-model-first prompting with negative constraints. Describe what you’re building, what threats apply, and what the code must not do.
Step 4: Reverse-prompt the output. After the model generates code, switch to review mode. “What vulnerabilities does this have?” “How would you bypass this auth check?” “What’s missing?” Feed the model’s own critique back into the next iteration.
Step 5: Run automated scans and iterate. Semgrep, npm audit, the pipeline from Part 6. Feed findings back to the model with a security engineer role. Repair, re-scan, repeat.
Step 6: Encode lessons as permanent instructions. Every vulnerability you find — through reverse prompting, automated scanning, or manual review — becomes a constraint in your instruction file. The instruction file grows with every project, capturing your team’s security knowledge in a form the AI applies automatically.
To make this concrete, here’s a before/after using the login endpoint from QuickNote (Part 5).
Naive prompt:
“Build a login endpoint for my Express.js app with Supabase.”
This is what produced the QuickNote vulnerabilities: no rate limiting, no token expiration, credentials in environment variables baked into the Docker image, RLS disabled. Here’s a representative output:
// Naive prompt output — typical AI-generated login
app.post('/api/login', async (req, res) => {
  const { email, password } = req.body;
  const { data, error } = await supabase.auth.signInWithPassword({
    email, password
  });
  if (error) return res.status(401).json({ error: 'Invalid credentials' });
  res.json({ token: data.session.access_token, user: data.user });
});
No rate limiting — an attacker can try thousands of passwords per minute. The token goes straight to the response body, where the frontend stores it in localStorage (accessible to any XSS). No input validation. No token expiration check. The Supabase credentials are baked into the Docker image at build time. This is what the model generates by default.
Security-aware prompt (using the pipeline):
“You are a senior developer with years of experience building secure authentication systems. Build a login endpoint for an Express.js app using Supabase. This endpoint will be publicly accessible on the internet. Assume attackers will attempt brute-force attacks, credential stuffing, and token theft. The endpoint MUST: rate-limit login attempts (max 5 per minute per IP), use bcrypt for password verification, return JWT tokens with a 1-hour expiration set via expiresIn, store tokens in httpOnly secure cookies (not localStorage), validate all input server-side. Do NOT hardcode any secrets — use environment variables loaded at runtime only. Do NOT disable Supabase RLS on any table. After generating the code, list any remaining security concerns I should address.”
Same model, same task — different output:
// Security-aware prompt output — same model, same task
const loginLimiter = rateLimit({
  windowMs: 60 * 1000, max: 5,
  message: { error: 'Too many login attempts, try again later' }
});

app.post('/api/login', loginLimiter, async (req, res) => {
  const { email, password } = req.body;

  // Server-side input validation
  if (!email || typeof email !== 'string' || !email.includes('@')) {
    return res.status(400).json({ error: 'Valid email required' });
  }
  if (!password || typeof password !== 'string' || password.length < 8) {
    return res.status(400).json({ error: 'Invalid password format' });
  }

  const { data, error } = await supabase.auth.signInWithPassword({
    email: email.trim().toLowerCase(),
    password
  });
  if (error) {
    logger.warn('Failed login attempt', { email, ip: req.ip });
    return res.status(401).json({ error: 'Invalid credentials' });
  }

  // Token in httpOnly cookie, not response body
  res.cookie('session', data.session.access_token, {
    httpOnly: true, secure: true, sameSite: 'strict',
    maxAge: 3600000 // 1 hour
  });
  res.json({ user: { id: data.user.id, email: data.user.email } });
});
Rate limiting. Input validation. Token in an httpOnly cookie, not the response body. Failed attempts logged. Email normalized. The model didn’t learn anything new between the two prompts — the security-aware prompt activated what it already knew.
The Prompt Engineering Checklist
- Set a specific professional role before every code generation or review task — “senior developer” for building, “senior pentester” for reviewing
- Reverse-prompt before coding: ask the model to identify security risks, recommend auth models, and flag common mistakes for your specific feature
- Include threat context in every code request: name the threats (IDOR, XSS, injection, brute force) and specify the attack surface (public API, multi-tenant, handles payments)
- Add negative constraints for your stack’s known pitfalls: “Do NOT use localStorage for tokens,” “Do NOT disable RLS,” “Do NOT skip server-side validation”
- Reverse-prompt after code generation: ask the model to review its own output as a pentester and list what’s missing or vulnerable
- Run Semgrep and feed findings back with a security engineer role — don’t just say “fix these,” ask it to distinguish true positives from false positives
- Create an instruction file (
.claude/claude-security-guidance.md,.github/copilot-instructions.md, or equivalent) with your permanent security constraints - Start with an open-source security ruleset (SecureCodeWarrior, Robotti.io, Trail of Bits skills) and customize it
- Audit instruction files for hidden characters and treat them as security-critical code in version control
- Add every vulnerability you discover to your constraint list — your instruction file should grow with every project and every security review
If You Do Nothing Else
Ten checklist items and a six-step pipeline can feel like a lot when you’re a solo founder shipping a feature at midnight. Here’s the minimum: set a role and add three constraints.
“You are a senior developer building a secure web application. Build [your feature]. Do NOT store tokens in localStorage. Do NOT skip server-side input validation. Do NOT hardcode secrets.”
That’s it. One sentence of role-setting plus three “Do NOT” constraints tailored to your stack. It takes ten seconds to type and covers the vulnerabilities I see most often in vibe-coded apps. Add the reverse-prompt step when you have time — ask the model to review its own output as a pentester. Those two moves alone close a surprising amount of the gap.
On prompt length: there’s a point of diminishing returns. The Kharma study showed that overloading a prompt with security concerns can degrade functional code quality — the model tries to satisfy too many constraints at once and introduces logic bugs. In practice, I keep security prompts under a paragraph for individual code requests. If you need more than five or six constraints, that’s a sign to move them into an instruction file where they apply automatically rather than cramming them into every prompt.
What You Should Take From This
Prompt engineering for security isn’t about tricking the model into being careful. It’s about activating knowledge the model already has. The generation-review asymmetry — 55.8% vulnerable output, 78.7% detection in review — tells us the security knowledge is there. The default prompt just doesn’t ask for it.
The five strategies in this post close that gap from different angles. Role-setting activates domain expertise. Reverse prompting forces the model to think about threats before and after generation. Threat-model-first prompting gives the model the context it needs to make secure architectural decisions. Negative constraints prevent the specific mistakes you’ve seen before. Iterative repair catches what slipped through.
None of this replaces the manual review I described in Part 6. A well-prompted model still misses roughly 20% of its own vulnerabilities in review mode, and architectural issues like broken authorization logic require human judgment. But a well-prompted model produces code that’s measurably safer — up to 56% fewer vulnerabilities — and that narrows the gap the manual review needs to cover.
My workflow at VULNEX: role first, questions second, code with constraints third, review fourth, scan fifth, and encode everything I learn into instruction files that make the next project start from a stronger baseline. The instruction file is the compound interest of security knowledge — every engagement makes the next one more secure by default.
As always: trust nothing, verify everything.
- X (Twitter): @SimonRoses
Further Reading
- What Is Vibe Coding Security? A Field Guide for 2026 — Part 1 of this series
- The OWASP Top 10 for Vibe-Coded Applications — Part 2 of this series
- Anatomy of a Vibe Coding Breach: Lessons from 2026’s Worst Incidents — Part 3 of this series
- The Dependency Trap: Supply Chain Risks in AI-Generated Code — Part 4 of this series
- Authentication & Secrets: What AI Gets Wrong Every Time — Part 5 of this series
- Scanning Vibe-Coded Apps: Why Traditional SAST/DAST Falls Short — Part 6 of this series
References
- Blain & Noiseux (2026). Broken by Default: A Formal Verification Study of AI-Generated Code Vulnerabilities. arXiv 2604.05292.
- Bruni et al. (2025). Benchmarking Prompt Engineering Techniques for Secure Code Generation with GPT Models. FORGE 2025.
- Kharma et al. (2026). An Empirical Evaluation of LLM-Generated Code Security Across Prompting Methods. arXiv 2605.24298.
- CodeRabbit (2025). State of AI vs Human Code Generation Report.
- Veracode (2025). GenAI Code Security Report.
- Apiiro (2025). 4x Velocity, 10x Vulnerabilities: AI Coding Assistants Are Shipping More Risks.
- Pillar Security (2025). Rules File Backdoor: How Hackers Can Weaponize Code Agents.
- Anthropic (2026). Claude Code Security Guidance Plugin.
- SecureCodeWarrior (2026). AI Security Rules. GitHub.
- Trail of Bits (2026). Claude Code Skills for Security. GitHub.
- VULNEX (2026). usecvislib — Universal Security Visualization Library. GitHub.