OWASP Top Ten 2013 free workshop

Yesterday, July 17th, I taught a free workshop about the OWASP Top Ten 2013 which was published recently that describes the 10 most common vulnerabilities in Web applications. This free workshop is a collaboration between the Catedral de Innovación of the City Council of Madrid, Spain and VULNEX to raise awareness about cyber security.

You can download the presentation from VULNEX website.

If you develop web applications, this document is for you!

Here I leave a photo of the workshop 😉

vulnex_OWASP_17junio13

I would like to thank the Catedral de Innovación and all attendees.

Until the next event!

What topics would you like me to cover at upcoming events?

— Simon Roses Femerling

Posted in Security, Technology, Threat Modeling | Tagged , , , , , , | Leave a comment

A Spanish startup selected by the DARPA Cyber Fast Track (CFT)

The security landscape changed in August 2011 at the Black Hat Conference when the legendary hacker of the L0pht Peiter “Mudge” Zatko presented the new program Cyber Fast Track (CFT) (DARPA-PA-11-52) from DARPA (Defense Advanced Research Projects Agency of the United States Department of Defense) to finance R&D projects by hackers and SMEs. Detailed information about the program is available on DARPA CFT website (currently offline). DARPA CFT

The idea is simple, times have changed and hackers and small businesses are the ones who have ideas and agility to innovate but not the resources, and this is precisely what the program brings. Many countries should take note of this innovative idea that enhances creativity and R&D.

To facilitate the admission process a series of documents and guides was released. The idea was to streamline and simplify the process for people not accustomed to dealing with government bureaucracy. No doubt a great idea and a great help.

Besides being an unusual event for DARPA to finance hackers (I think that it was the only program of its kind in the world), more unusual was the fact that this program was open to any hacker and security boutique around the world!

Through the company I funded last year VULNEX, a startup specializing in cyber security located in Madrid, we decided to try our luck and created a proposal for R&D that we sent in August 2012 and five days later we received a call from the DARPA communicating that they had accepted our project, incredible.

The objective of the project was to improve security in the software development lifecycle. The project duration was five months analyzing the different compilers (Visual Studio, GCC and LLVM) and versions to determine security/mitigations measures offered, its effectiveness and how they affect the binaries produced.

With this in-depth analysis, the second and third phases of the project consisted in developing two technologies to help developers to produce secure software.

One of the technologies developed is BinSecSweeper, a powerful and easy-to-use tool to analyze binary security posture. The tool is open source, cross-platform and capable of analyzing different types of binaries and architectures. BinSecSweeper will be available on VULNEX website soon.

It is a pity that DARPA did close the CFT program last April 1, 2013, in which about 500 projects of more than 1500 received have benefited. The selected projects have been very interesting tools and are presented in top security conferences, I would recommended to do a web search to find many of these projects.

Certainly a disruptive idea that has been of great help for hackers and SMEs, and for us VULNEX, a Spanish startup, a pleasant experience to collaborate with DARPA and our technology presented at internal events 🙂 

From here we will like to thank Mudge, DARPA and the staff of BITSystems (responsible for the CFT management), great folks!

Thank you!

Did you know about the DARPA CFT? What do you think?

— Simon Roses Femerling

Posted in Business, Pentest, Security, Technology | Tagged , , , , , | Leave a comment

What’s the point of reporting 0day?

In the last weeks the news related to PRISM has not stopped since leaked by Edward Snowden, who worked for Booz Allen Hamilton, a defense contractor for the NSA.

One interesting outcome of these leaks is the NSA access to 0Day vulnerabilities on Microsoft products and who knows if other big companies as well (Google, Apple, Adobe, etc.) under the cooperation programs Microsoft Active Protections program (MAPPS) and the Security Cooperation Program (SCP). The first program is for security companies and the second for government agencies -for example the Spanish intelligence agency (CNI) is a member of this program- in order to be informed first when vulnerabilities appear to be able to protect themselves before the security patch is released and to update their security products.

These programs were created for defensive purposes, but they raise an interesting issue: the use of this information for offensive purposes.

Finding vulnerabilities in products from large companies is increasingly more expensive so access to information about 0day by intelligence agencies makes them gain time and save resources. Now they only have to develop exploits to attack any system, remember that the security patch has not been published yet…

Countries wishing to establish offensive and defensive capabilities should create national programs that offer financial rewards (depending on a scale) to individuals that inform them of 0Day.

Large software and big Internet companies are mainly American but many vulnerabilities are discover and reported by foreign security experts. If there were a national program in place on vulnerability reporting they could first inform their Government and not the software companies.

The question is why to report vulnerabilities to software companies so they in turn inform their intelligence agencies to carry out offensive actions against other nations?

Remember that 0Day vulnerabilities and exploits have economic value today, and many public and private companies pay good money for them.

Quite honestly we should not be surprised by NSA acts since at the end their mission is national security using all possible means (legal ¿?), the same as many countries’ intelligence agencies.

What is clear is that the PRISM case may have more consequences to the United States as seemed at first, and certainly many countries will change their policies on defensive / offensive cyber security.

It will certainly be interesting to see how cyber security policies evolve in countries in the coming years.

What changes do you think are necessary in cyber security policies?

— Simon Roses Femerling

Posted in Business, Microsoft, Pentest, Security, Technology | Tagged , , , , , , , , , , | Leave a comment

A tale of Government Trojans

Sorry, only in Spanish 🙂

— Simon Roses Femerling

Posted in Pentest, Privacy, Security, Technology | Tagged , , , , , , , , , | Leave a comment

AppSec: Build Rooted Detection in your App

For various reasons many Apps need to detect if the phone has been “rooted” and in this article will see different techniques for this purpose. Since it is common to see this type of questions in development forums, I thought a post on the subject would be of interest to many readers.

In this StackOverflow post we can find techniques commonly used in Apps for Rooted detection. The following code makes use of three methods for detecting Rooted: the first check for the string “test-keys”, which is a generic key for signing packages; the second method checks whether the Superuser.apk exist in disk, this App manages access to “su” command (administrator privileges) for other Apps; and finally the third method calls “su” directly and runs a root command.


 /**
 * @author Kevin Kowalewski
 * 
 */
public class Root {

    private static String LOG_TAG = Root.class.getName();

    public boolean isDeviceRooted() {
        if (checkRootMethod1()){return true;}
        if (checkRootMethod2()){return true;}
        if (checkRootMethod3()){return true;}
        return false;
    }

    public boolean checkRootMethod1(){
        String buildTags = android.os.Build.TAGS;

        if (buildTags != null && buildTags.contains("test-keys")) {
            return true;
        }
        return false;
    }

    public boolean checkRootMethod2(){
        try {
            File file = new File("/system/app/Superuser.apk");
            if (file.exists()) {
                return true;
            }
        } catch (Exception e) { }

        return false;
    }

    public boolean checkRootMethod3() {
        if (new ExecShell().executeCommand(SHELL_CMD.check_su_binary) != null){
            return true;
        }else{
            return false;
        }
    }
}

/**
 * @author Kevin Kowalewski
 *
 */
public class ExecShell {

    private static String LOG_TAG = ExecShell.class.getName();

    public static enum SHELL_CMD {
        check_su_binary(new String[] {"/system/xbin/which","su"}),
        ;

        String[] command;

        SHELL_CMD(String[] command){
            this.command = command;
        }
    }

    public ArrayList executeCommand(SHELL_CMD shellCmd){
        String line = null;
        ArrayList fullResponse = new ArrayList();
        Process localProcess = null;

        try {
            localProcess = Runtime.getRuntime().exec(shellCmd.command);
        } catch (Exception e) {
            return null;
            //e.printStackTrace();
        }

        BufferedWriter out = new BufferedWriter(new OutputStreamWriter(localProcess.getOutputStream()));
        BufferedReader in = new BufferedReader(new InputStreamReader(localProcess.getInputStream()));

        try {
            while ((line = in.readLine()) != null) {
                Log.d(LOG_TAG, "--> Line received: " + line);
                fullResponse.add(line);
            }
        } catch (Exception e) {
            e.printStackTrace();
        }

        Log.d(LOG_TAG, "--> Full response was: " + fullResponse);

        return fullResponse;
    }

}

Apps on a not rooted phone cannot run either of these methods, since all Android Apps by default are in a sandbox (a system of process isolation) and with limited privileges.

The three methods described may be the most common and if we reverse engineering often we can find them in well-known Apps.

Other techniques include the use of the fantastic RootTools library that facilitates the development of Apps that need root offering various tools. Many Apps use this library.

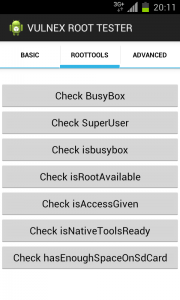
Library features include check if it exists or offers to install BusyBox (program that combines many Unix utilities in a small single executable), check if it exists or offers to install SuperUser, verify that App has root access, native tools or enough space on the SD Card.

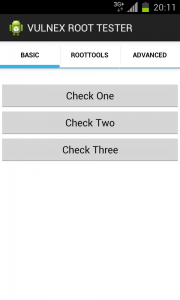
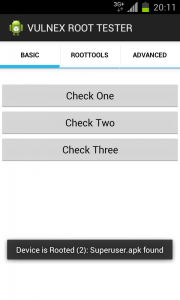
As an exercise to test these root detection techniques, I have written the VULNEX ROOT TESTER that combines different techniques from the basic here presented to some more sophisticated that we will cover in another post. Find below some screenshots of the tool.

vulnex_root_tester1

vulnex_root_tester2

vulnex_root_tester3

vulnex_root_tester4

No doubt the ability to detect Rooted may be necessary for certain Apps that require a high level of security, but also for many legitimate Apps, such as various security Apps, that require root to function properly or take maximum advantage of the Android platform.

We have to bear in mind that to develop a secure App it is not enough to detect Rooted, but we should think about making a threat modeling of the potentials risks to our App, secure development practices (for example OWASP Mobile) and apply code obfuscation techniques among many other security measures, in order to mitigate vulnerabilities and hinder reverse engineering. My recommendation is that if you are not familiar with these concepts you should talk to some application security professional and get help.

What techniques is your App using to detect Rooted, if any?

— Simon Roses Femerling

Posted in Pentest, Privacy, Security, Technology, Threat Modeling | Tagged , , , , , , , | Leave a comment

OSINT + Python = Custom Hacking

Last May 10 and 11 the course of Computer Forensic Expert was held in Reus (Spain) by the Asociación Nacional de Tasadores y Peritos Judiciales Informáticos (ANTPJI), which I am member and one of the instructors, where I had the pleasure of giving a talk on two of my passions such as Python and OSINT (Open Source Intelligence).

Python is a great language to quickly develop all kinds of powerful applications with lots of libraries to perform exploits, reverse engineering, web analysis tools and more. No doubt a useful knowledge for any security expert.

Internet is immense, sheltering all unimaginable information and this is the reason why OSINT techniques are vital to collect, analyze and present this information.

For this course, I decided it would be interesting for attendees to learn how to develop simple tools (scripts) that allow them to perform OSINT using Python with a series of practical exercises with a specific objective each.

Presentation and code are available at VULNEX website.

Note: I have removed from the scripts the Google Hacking query, so the reader can insert its own query.

Tool #1

Objective: search ANTPJI members on LinkedIn using Google Custom Search API.

These scripts are very simple and do the same thing but in a different way. The first one uses the Google API Client, while the second uses the fantastic Requests library.

In these scripts we are using some Google Hacking to find members of the association on LinkedIn.


# File: ex1_a.py
# Date: 05/14/13
# Author: Simon Roses Femerling
# Desc: Basic Google Hacking 
#
# VULNEX (C) 2013
# www.vulnex.com

import const
from apiclient.discovery import build
import pprint

# your google hacking query
query=''
query_params=''

doquery=query+query_params

service = build("customsearch","v1",developerKey=const.cse_token)

res = service.cse().list(
	q=doquery,
	cx=const.cse_id,
	num=10).execute()

pprint.pprint(res)

# VULNEX EOF

# File: ex1_b.py        
# Date: 05/14/13
# Author: Simon Roses Femerling
# Desc: Simple Google Hacking                
#
# VULNEX (C) 2013
# www.vulnex.com

import requests
import json
import urllib
import const

site="https://www.googleapis.com/customsearch/v1?key="

# Your Google Hacking query
query='' 
query_params='' 

url=site+const.cse_token+"&cx="+const.cse_id+"&q=" + urllib.quote(query+query_params)
response = requests.get(url)
print json.dumps(response.json,indent=4)

# VULNEX EOF

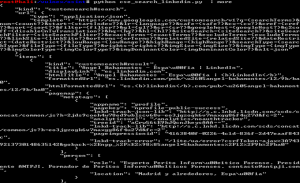
When running any of these scripts, we get the following result:
py_osint_img1

Not too interesting for the moment 🙂

Tool #2

Objective: obtain photos of the ANTPJI members LinkedIn profiles using Google Custom Search API.

The following script gets the photos of the members of the association on LinkedIn and also extracts picture metadata 😉 The script generates an HTML page with all the photos.

Used libraries: Google API Client, PIL, Requests and Markup.


# File: ex2.py         
# Date: 05/14/13
# Author: Simon Roses Femerling
# Desc: Download picture and extract metadata               
#
# VULNEX (C) 2013
# www.vulnex.com

import const
from apiclient.discovery import build
import pprint
import os
from PIL import Image
from StringIO import StringIO
from PIL.ExifTags import TAGS
import requests
import markup

def do_query(istart=0):
	if istart == 0:
		res = service.cse().list(
		q=doquery,
		cx=const.cse_id,
		num=10).execute()
	else:
		res = service.cse().list(
		q=doquery,
		cx=const.cse_id,
		num=10,
		start=istart).execute()
	return res

pic_id=1
do_stop=10
cnt=1

page=markup.page()

# Set page title
page.init(title="ANTPJI OSINT") 
page.h1("ANTPJI OSINT")

# Set output directory
out_dir = "pics_gepl"

# Your Google Hacking query 
query=''
query_params=''

doquery=query+query_params

service = build("customsearch","v1",developerKey=const.cse_token)

if not os.path.exists(out_dir):
	os.makedirs(out_dir)

res=[]
while True:
	if cnt==1:
		res = do_query()
	else:
		if not res['queries'].has_key("nextPage"): break
		res = do_query(res['queries']['nextPage'][0]['startIndex'])
	cnt+=1
	if cnt > do_stop: break
	if res.has_key("items"):
		for item in res['items']:
			name=""
			if not item.has_key('pagemap'): continue
			if not item['pagemap'].has_key('hcard'): continue
			hcard = item['pagemap']['hcard']
			for card in hcard:
				pic_url=""
				if 'title' in card:
					if 'fn' in card: name = card['fn']
					if 'photo' in card: pic_url = card['photo']
				if pic_url != "":	
					image = requests.get(pic_url)
					pic_n = os.path.join(out_dir,"%s.jpg") % pic_id
					file = open(pic_n,"w")
					pic_id+=1
					try:
						i = Image.open(StringIO(image.content))
						if hasattr(i,"_getexif"):
							ret = {}
							info = i._getexif()
							if info:
								for k,v in info.items():
									decode = TAGS.get(k,v)
									ret[decode] = v
								print ret
						i.save(file,"JPEG")
						page.p(name.encode('ascii','ignore')) 
						page.img(src=pic_n)
						page.br()
						page.br()
					except IOError, e:
						print "error: %s" % e
					file.close()			

# Set your output filename
with open('index_gepl.html','w') as fp:
	fp.write(str(page))

# VULNEX EOF

And this is the result:

py_osint_img2

With few lines of code we have got a very interesting tool.

Tool #3

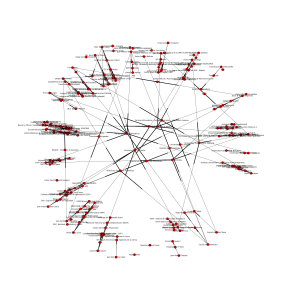
Objective: what is the relationship of ANTPJI members on LinkedIn?

With this script we are looking for the relationship between the members of the association at LinkedIn and create a graph that relates the words.

Used libraries: Google API Client, NetworkX and Matplotlib.


# File: ex3.py         
# Date: 05/14/13
# Author: Simon Roses Femerling
# Desc: Build graph from profiles                
#
# VULNEX (C) 2013
# www.vulnex.com

import const
from apiclient.discovery import build
import networkx as nx
import matplotlib.pyplot as plt

def do_query(istart=0):
	if istart == 0:
		res = service.cse().list(
		q=doquery,
		cx=const.cse_id,
		num=10).execute()
	else:
		res = service.cse().list(
		q=doquery,
		cx=const.cse_id,
		num=10,
		start=istart).execute()
	return res

do_stop=10
cnt=1

# Your Google Hacking query here
query=''
query_params=''

doquery=query+query_params

service = build("customsearch","v1",developerKey=const.cse_token)

G=nx.DiGraph()
res=[]
while True:
	if cnt==1:
		res = do_query()
	else:
		if not res['queries'].has_key("nextPage"): break
		res = do_query(res['queries']['nextPage'][0]['startIndex'])
	cnt+=1
	if cnt > do_stop: break
	if res.has_key("items"):
		for item in res['items']:
			name=""
			if not item.has_key('pagemap'): continue
			if not item['pagemap'].has_key('hcard'): continue
			hcard = item['pagemap']['hcard']
			for card in hcard:
				if 'title' in card:
					if 'fn' in card: name = card['fn']
				G.add_edge(name,card["fn"])		
			
plt.figure(figsize=(30,30))
nx.draw(G)
# Set your output filename
plt.savefig('antpji_rela_map.png')

# VULNEX EOF

And this is the graph generated:
py_osint_img3

Tool #4

Objective: what’s hot on Twitter account of the association?

This script downloads the latest tweets from the account of the association and generates a tag cloud. Useful to quickly view what are they talking about.

Used libraries: Requests, pytagcloud.


# File: ex4.py         
# Date: 05/14/13
# Author: Simon Roses Femerling
# Desc: Create word cloud               
#
# VULNEX (C) 2013
# www.vulnex.com

import requests
import json
import urllib
import const

from pytagcloud import create_tag_image, make_tags
from pytagcloud.lang.counter import get_tag_counts

site="http://search.twitter.com/search.json?q="

# Your query here
query=""

url=site+urllib.quote(query)

response = requests.get(url)

tag = []
for res in response.json["results"]:
	tag.append(res["text"].encode('ascii','ignore'))

text = "%s" % "".join(tag)	
tags = make_tags(get_tag_counts(text),maxsize=100)
# Set your output filename
create_tag_image(tags,"antpji_word_cloud.png", size=(600,500), fontname="Lobster")

# VULNEX EOF

And this is the tag cloud:

py_osint_img4

Tool #5

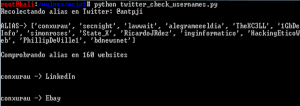
Objective: do the ANTPJI usernames from Twitter exist on social networks sites?

The following script extracts the usernames that have been published or mentioned in the Twitter of the association and checks in 160 social networks sites.

Used libraries: Requests.


# File: ex5.py         
# Date: 05/14/13
# Author: Simon Roses Femerling
# Desc: Check usernames on 160 social network sites               
#
# VULNEX (C) 2013
# www.vulnex.com

import requests
import json
import urllib
import const
import pprint

site="http://search.twitter.com/search.json?q="

# Your query here
query=""

url=site+urllib.quote(query)

print "Recolectando alias en Twitter: %s\n" % query
response = requests.get(url)

users = []

for res in response.json["results"]:
	if res.has_key('to_user'):
		if not res['to_user'] in users: users.append(str(res["to_user"]))
	if res.has_key('from_user'):
		if not res['from_user'] in users: users.append(str(res["from_user"]))

print "ALIAS-> %s" % users

print "\nComprobrando alias en 160 websites\n"
for username in users:	
	for service in const.services:  
      		try:    
			res1 = requests.get('http://checkusernames.com/usercheckv2.php?target=' + service + '&username=' + username, headers={'X-Requested-With': 'XMLHttpRequest'}).text
			if 'notavailable' in res1: 
				print ""
				print username + " -> " + service 
				print "" 
      		except Exception as e:  
           		print e 

# VULNEX EOF

And the result is as follows:
py_osint_img5

Tool #6

Objective: can we extract metadata from ANTPJI photos?

This script downloads the photos related to ANTPJI from Google and extracts the metadata.

Used libraries: Requests, PIL and Markup.


# File: ex6.py         
# Date: 05/14/13
# Author: Simon Roses Femerling
# Desc: Download pictures from Google and extract metadata               
#
# VULNEX (C) 2013
# www.vulnex.com

import const
from apiclient.discovery import build
import pprint
import os
from PIL import Image
from StringIO import StringIO
from PIL.ExifTags import TAGS
import requests
import markup

def do_query(istart=0):
	if istart == 0:
		res = service.cse().list(
		q=doquery,
		cx=const.cse_id,
		num=10).execute()
	else:
		res = service.cse().list(
		q=doquery,
		cx=const.cse_id,
		num=10,
		start=istart).execute()
	return res

pic_id=1
do_stop=10
cnt=1

page=markup.page()
# Set your page title
page.init(title="ANTPJI OSINT") 
page.h1("ANTPJI OSINT")

# Set output directory
out_dir = "pics_gepl"

# Define your Google hacking query here
query=''
query_params=''

doquery=query+query_params

service = build("customsearch","v1",developerKey=const.cse_token)

if not os.path.exists(out_dir):
	os.makedirs(out_dir)

res=[]
while True:
	if cnt==1:
		res = do_query()
	else:
		if not res['queries'].has_key("nextPage"): break
		res = do_query(res['queries']['nextPage'][0]['startIndex'])
	cnt+=1
	if cnt > do_stop: break
	if res.has_key("items"):
		for item in res['items']:
			name=""
			if not item.has_key('pagemap'): continue
			if not item['pagemap'].has_key('hcard'): continue
			hcard = item['pagemap']['hcard']
			for card in hcard:
				pic_url=""
				if 'title' in card:
					if 'fn' in card: name = card['fn']
					if 'photo' in card: pic_url = card['photo']
				if pic_url != "":	
					image = requests.get(pic_url)
					pic_n = os.path.join(out_dir,"%s.jpg") % pic_id
					file = open(pic_n,"w")
					pic_id+=1
					try:
						i = Image.open(StringIO(image.content))
						if hasattr(i,"_getexif"):
							ret = {}
							info = i._getexif()
							if info:
								for k,v in info.items():
									decode = TAGS.get(k,v)
									ret[decode] = v
								print ret
						i.save(file,"JPEG")
						page.p(name.encode('ascii','ignore')) 
						page.img(src=pic_n)
						page.br()
						page.br()
					except IOError, e:
						print "error: %s" % e
					file.close()			

# Set your output filename
with open('index_gepl.html','w') as fp:
	fp.write(str(page))

# VULNEX EOF

A picture is worth a thousand words!

py_osint_img6

As we have seen throughout this article we can easily write sophisticated OSINT tools with a little bit of Python that allows us to gather lots of information about individuals or collectives.

If you would like me to go into any topic in Python and OSINT in depth let me know 🙂

What tools do you use for OSINT?

— Simon Roses Femerling

References

Posted in Pentest, Privacy, Security, Technology | Tagged , , , , , , , , , , | 10 Comments

My 10 Cyber Weapons Tool List

Few weeks ago the media did publish that the US Air Force has classified 6 tools as cyber weapons, no doubt a hot topic. For this post I will do the same and put a list of 10 tools that could be Cyber weapons, my list.

My selection is based in the following criteria: its usefulness, features and open source or free at least.

Logically there are more tools that I like or that I use, but I think that this list is a great collection to carry out attacks in networks and systems, reverse engineering, traffic analysis, social engineering, vulnerability discovery and exploits development, for sure tools that should be in the toolkit of all pentester 🙂

  1. Metasploit: the pentesting tool per excellence.
  2. SET: wide features to perform social engineering attacks.
  3. Dsploit: nothing like carry a pentesting toolkit on your mobile for Android.
  4. Nmap: popular network scanner and more.
  5. WireShark: analyzes network traffic, simple and powerful.
  6. Ettercap: all kinds of network attacks.
  7. Immunity Debugger: a little bit of reverse engineering combined with Python scripting.
  8. Mona: powerful script for the previous tool or Wingdb to develop exploits.
  9. Peach: Complete framework to find vulnerabilities via fuzzing.
  10. Androguard: Reverse engineering Android Apps.

Which is your list of 10 cyber weapons?

— Simon Roses Femerling

Posted in Pentest, Security, Technology | Tagged , , , , , , , , , , | 1 Comment

AppSec: Improve your software security with GCC Stack Protector Strong

The other day helping out a client to develop secure software it came to my mind that this topic could be of interest to my readers. Obviously this topic is quite wide, but in this article I will focus in a patch for the GCC compiler, which improves the protection of stack protector (stack canary) mitigating buffer overflow vulnerabilities.

Stack Protector Strong is a patch developed at Google and applied to the Chromium project (browser Chromium and Chromium OS) that substantially improves this defense (StackGuard). By default on GGC we have the switches -fstack-protector and -fstack-protector-all that we can use to compile software: the first switch analyzes each function in the code and if it detects a possible vulnerability applies the defense when compiling the program (the programmer does not have to do anything, well just develop secure ;)), while the second switch applies the defense to ALL functions in the program without validating if they are vulnerable.

Both options have their respective problems: the first switch (-fstack-protector) is limited by the code it considers vulnerable while the second switch (-fstack-protector-all) is too aggressive affecting the performance of the application.

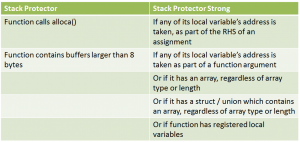
Because of these problems at Google they decided to develop a third switch, -fstack-protector-strong, covering more cases of vulnerable code without sacrificing performance. In figure 1 we can see a comparison between – fstack-protector and -fstack-protector-strong.

stack_protector_VS
Fig. 1 – -fstack-protector vs. –fstack-protector-strong

Clearly a substantial improvement covering more types of possible vulnerabilities in code, but enough theory for today, let’s move on to a practical exercise where we will install the patch to the latest GCC 4.8.0 version, recently posted, on a Linux Debian 6.0.

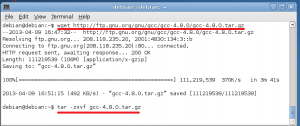
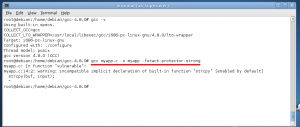
The first step is to download GCC version that we want to patch. The patch was written for version 4.6, although I have tested with versions 4.7 and 4.8 and it works correctly. So we run the command wget with GCC URL and then unzip it (see figure 2).

gcc_cap1
Fig. 2 – GCC Download

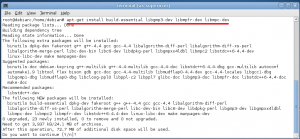
To compile GCC we must have the following libraries installed and to install them we will use the command apt-get (see figure 3):

  • Build-essential
  • libgmp3-dev
  • libmpfr-dev
  • libmpc-dev
  • zip
  • autogen

gcc_cap2
Fig. 3 – Installing required packages to compile GCC

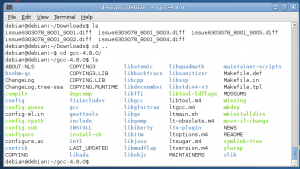
Now let’s download the -fstack-protector-strong patch from here. The patch is composed of 5 diff files.

gcc_cap4
Fig. 4 – Downloaded patches

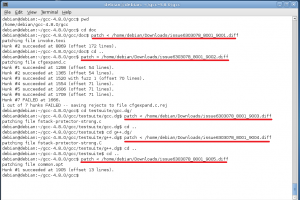
We then proceed to patch GCC and we must follow the order that is showed in figure 5. Pay special attention to the order of the directories within the GCC.

gcc_cap5
Fig. 5 – Applying patches to GCC

Once we have patched GCC we can compile it, for install it in the system we need to have root privileges (see figure 6). While the command is running you can read other articles on this blog since the process takes a while to complete 🙂

gcc_cap7
Fig.6- Compiling and installing GCC

Now we are ready to compile programs with the latest version of GCC and a better defense against buffer overflow vulnerabilities.

At figure 7 we compile a vulnerable program with the parameter -fstack-protector-strong.

gcc_cap9
Fig. 7 – Testing –fstack-protector-strong

When disassembling (reversing) myapp we can see that this defense has been applied to several functions that -fstack-protector would have not applied (although I leave this exercise for another article).

This patch is not currently in GCC by default but let us hope that it will be in future versions as well as new and better defenses.

It is true that there are attack vectors to bypass this protection, but all defenses are welcome when building software and currently all modern compilers (GCC, Visual Studio and LLVM) include a variety of defenses that programmers should always use.

No doubt the use of these defenses in compilers does not remove the need for developing secure software using a secure development framework such as the MS SDL or OpenSAMM.

Which security parameters do you use when compiling software?

— Simon Roses Femerling

Posted in Pentest, Privacy, Security, Technology, Threat Modeling | Tagged , , , , , , , , | Leave a comment

Book Review: The IDA Pro Book, 2nd edition

If you like reverse engineering and want to learn all the secrets of IDA Pro, this is your book. This work written by Chris Eagle, a top expert on the subject, reveals the power of the best tool for reverse engineering. The IDA Pro, 2nd Edition (ISBN-13: 978-1593272890) along its 26 chapters describes how to use IDA Pro and all its options, as well as the decompiler, debugger and the emulator, and of course the development of scripts using IDC and Python (IDAPython) languages.

IDA Pro is a complex tool to analyze all types of binaries, but this book makes it easy for novices to learn and those who are already experts can benefit from reading it as well.

The advanced sections of extending IDA Pro using IDC or Python are priceless; the author includes many scripts very well explained. Personally I’m a big fan of Python so all the chapters related to IDAPython for me are the most interesting.

On the book website we can find more resources and a number of plugins for IDA Pro, of special interest the x86 Emulator plugin.

The code that the book analyzes is for x86 under Windows, but IDA Pro supports many more platforms such as ARM or binaries for Linux (ELF) and MacOS (Mach-o) among others.

Certainly a must-read for any cybersecurity professional where it is vital to possess the necessary skills to find vulnerabilities in software or analyze malware.

Score (1 rose, very bad / 5 roses, very good): 5 Roses (Mandatory Reading)

— Simon Roses Femerling

Posted in Books, Pentest, Security, Technology | Tagged , , , , , , | Leave a comment

Back to Black Hat Europe and my talk on Anti-Theft

Last Thursday 14 and Friday 15 March the Conference Black Hat Europe was held in the great city of Amsterdam, a mandatory event for cyber security experts.

For second year running I presented on R&D outlining the security posture of Anti-Theft programs for computers and Smartphones.

As always the event had interesting lectures and other not that much, but I recommend the reader to check them all and decide what you like most. The topics were quite varied such as forensics, pentesting, vulnerabilities and secure development.

Regarding my talk, you can find the presentation on the website of VULNEX (here).

From here I would like to greet the people of MundoHacker and the other Spaniards at the conference!

Greetings and see you at the next conference 🙂

— Simon Roses Femerling

Posted in Conference, Pentest, Security, Technology | Tagged , , , , , , , , , | Leave a comment